Cross Model Mapping
You may want to create interactions between content items (data discoveries, slicers, dynamic content, or custom formulations) that are querying different data models. For such interactions to work, the hierarchies and member elements being used as a filter must also exist in the data model of the target visualization. Otherwise, when the visual is used as a filter in runtime, you will receive the following query error:
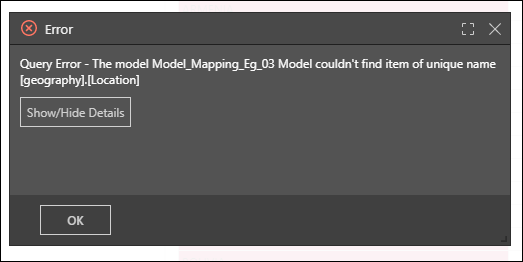
If the corresponding hierarchies and member elements are identically labeled in both data models, then you can create an interaction as usual. However, if the corresponding hierarchies and/ or member elements are not identically labeled in each data model, then it's necessary to create a model mapping.
In such a scenario, the Model Mapping wizard is used to map the corresponding hierarchies and/ or member elements from the two data models, enabling the user to create interactions between them.
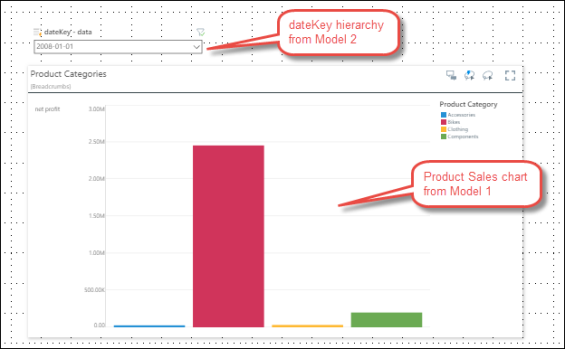
To enable the interaction from the dataKey slicer to the Product Sales chart, the user must configure a new model mapping which tells Pyramid that the two differently labeled hierarchies are the same.
Model Mapping Wizard
- Open the Model Mapping wizard from the Presentation ribbon.
- Click the blue plus sign in the Mapping tab to create a new model mapping.
- The new mapping will be listed; from the Settings panel name the mapping, and select the two models to be mapped (the selection order is not important).
- The Map Hierarchies panel will open; from the drop down under each model, select the hierarchy to be mapped.
- To map multiple hierarchies from the same models, click the plus sign in the Map Hierarchies panel.
- From the Map Members panel, select the mapping type: either Simple or Advanced. Continue reading for details.
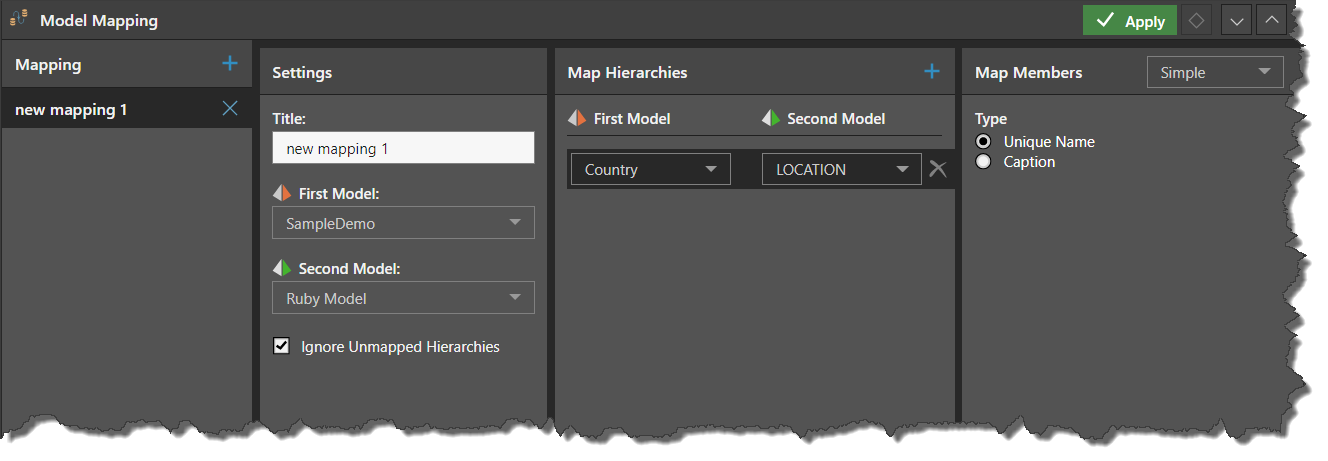
Ignore Unmapped Hierarchies
The models being mapped may contain multiple hierarchies that are similar, yet not identical. For instance, they may both contain hierarchies listing States, where the naming convention differs between the models. In this case, if you have no need to map these hierarchies, you can simply select the 'Ignore Unmapped Hierarchies' option. This will stop you from receiving an error when applying interactions between visuals from the mapped models.
Member Types
Unique Name
The unique name describes the member element path within the data model. It is written [Dimension].[Hierarchy].[Member]. The unique name of the Bikes member element, for instance, is [Products].[Product Category].[Bikes].
Caption
Caption describes the member element's label. The caption for to the Bikes member element is Bikes.
Mapping Types
There are 2 types of model mapping: simple and advanced. The type that you will need to configure will depend on what differences exist between the hierarchies being mapped.
Simple Mapping
If the hierarchies to be mapped are labeled differently, but each corresponding member element is identically labeled, choose Simple.
For instance, say the country hierarchy in Model 1 is called Country, while in Model 2 it's called Location. Within both hierarchies, the members are labeled identically. In this case, choose Simple and select the hierarchy name type (either Unique Name or Caption).
|
Model 1 |
Model 2 |
|---|---|
|
Country |
Location |
|
Australia |
Australia |
|
United States |
United States |
|
Canada |
Canada |
|
France |
France |
|
Germany |
Germany |
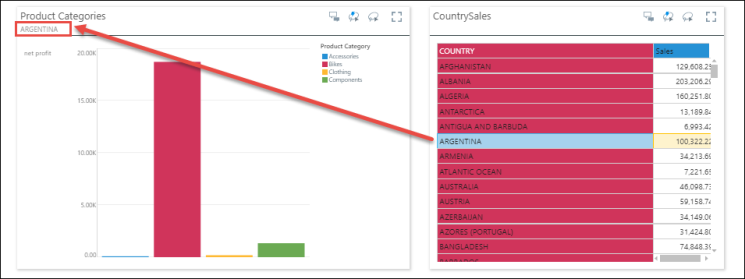
In this example, the slide contains 2 visuals: a Sales by Country grid (from Data Model 1), and a Net Profit by Product Categories chart (from Data Model 2). In Data Model 1, the hierarchy of countries is called "Country," while in Data Model 2 it's called "Location", as in the grid above. So, to add an interaction from the Country grid to the Products chart, it's necessary to configure a model mapping.
Step 1
From the Present ribbon click Model Mapping (red highlight).

Step 2
From the Mapping panel in the wizard, click the plus sign to create a new mapping. Under Settings, name the new mapping and then select the data models to be mapped.
Determine whether or not to ignore unmapped hierarchies.

Step 3
From Map Hierarchies, click the plus sign to choose the hierarchies that should be mapped. You can add multiple hierarchy mappings here. Each hierarchy mapping should contain the two corresponding hierarchies from each of the given models.
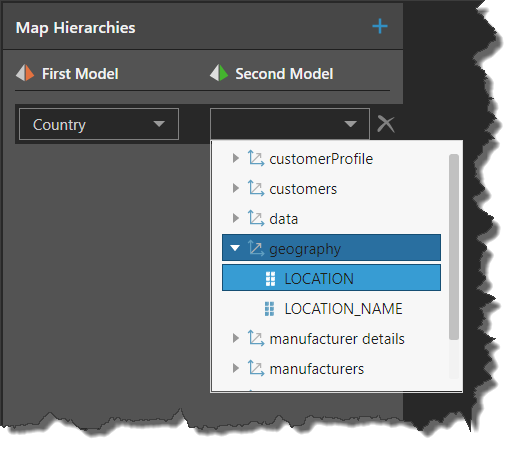
Step 4
Select the type of mapping; if the hierarchies have different names, but the members within them are the same, choose Simple. If the members within the hierarchies are labeled differently, choose Advanced. Click Apply.

Step 5
Add interactions between the required visuals. Launch the presentation in runtime to test the interactions.
Advanced Mapping
Advanced Mapping is required to map the member elements within two hierarchies, if the member elements are not identically labeled. In this case, the Advanced option must be selected in order to configure the dynamic functions required to map the differently labeled hierarchy members.
Click here to review the advanced mapping functions; for a detailed exampchele of advanced mapping for date hierarchies, review the MemberCaption function.
|
Model 1 |
Model 2 |
|---|---|
|
Country |
Country |
|
Australia |
AUS |
|
United States |
USA |
|
Canada |
CAN |
|
United Kingdom |
UK |
|
France |
FRA |
|
Germany |
GER |
This example is based on the grid above, mapping 2 country hierarchies. The country hierarchy in Model 1 lists countries according to their full name, while in Model 2 they are abbreviated. Because the unique names within the hierarchies are different, an advanced model mapping is required. This allows you to configure a formula to determine which unique name in Model 1 corresponds to which unique name in Model 2.
Step 1
Follow steps 1-3 of the simple model mapping example above.
Then, from the Map Members panel choose the member type; in this example, the unique member names need to be mapped, so 'Unique Name' is selected. Then select 'Advanced' from the drop-down (green highlight below).

Step 2
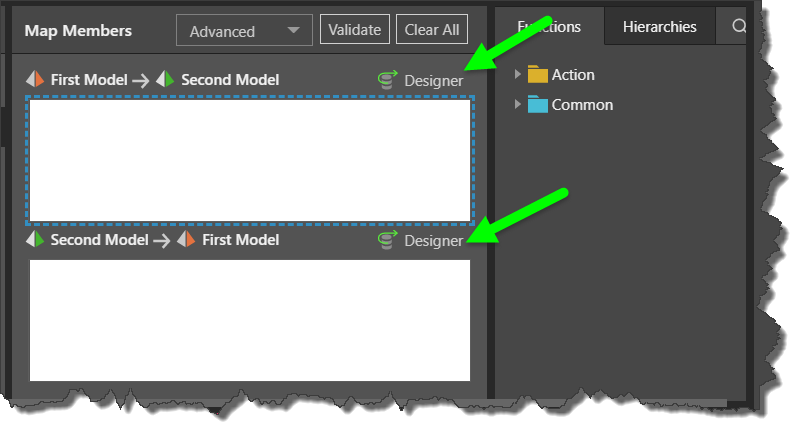
Now the Advanced model mapping tools are exposed; here you need to configure a formula to map the given hierarchies. There are 2 script windows here:
First Model > Second Model: configure the formula to allow interactions from the first model to the second model.
Second Model > First Model: write the formula that will enable interactions from the second model to the first model.
For each script window, you can click 'Designer' (green arrows) to open the Map Members designer, which features a full formula editor.
Step 3
Enter your formula in the relevant editor, using the functions and hierarchies trees (yellow highlight below) as required. At this stage, we are creating a mapping from the first model (which contains full country names) to the second model (which contains abbreviations).
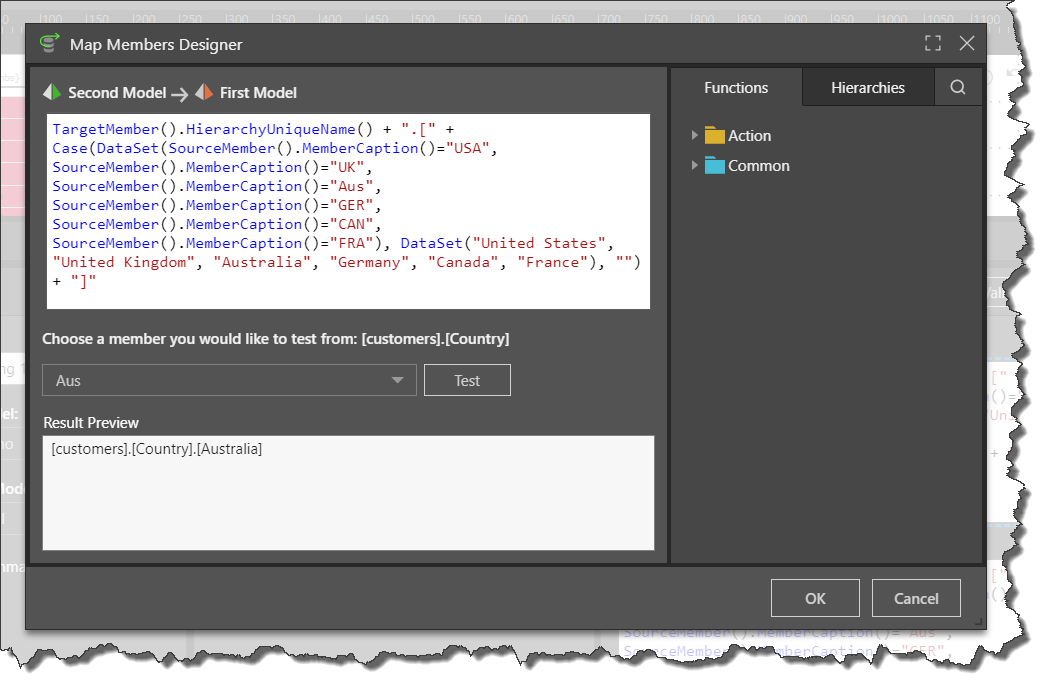
Once the formula is entered, choose member from the drop-down below the script editor and click test (green highlight); a preview will appear in the preview window (blue highlight). Click OK to confirm your formula.
In this example, the formula below was added. Using the TargetMember and HierarchyUniqueName functions, a Case formula was built determining that if the MemberCaption of the given SourceMember is "United States", "USA" should be returned, while if the given MemberCaption is "United Kingdom", "UK" should be returned.
The Left function is used to determine that if any other MemberCaption is given, a substring of the first 3 characters in the string should be returned (eg. CAN, FRA, etc).
TargetMember().HierarchyUniqueName() + ".[" + Case(DataSet(SourceMember().MemberCaption()="United States", SourceMember().MemberCaption()="United Kingdom"), DataSet("USA", "UK"), Left(SourceMember().MemberCaption(), 3)) + "]"
Step 4
Next, a formula is created (if needed) to enable interactions from the second model to the first.
In this example, the formula below was added. Here, Case function was used to specify which caption should be returned for each of the given member captions. For instance, if "USA" is selected, "United States" should be returned.
TargetMember().HierarchyUniqueName() + ".[" + Case(DataSet(SourceMember().MemberCaption()="USA", SourceMember().MemberCaption()="UK", SourceMember().MemberCaption()="Aus", SourceMember().MemberCaption()="GER", SourceMember().MemberCaption()="CAN", SourceMember().MemberCaption()="FRA"), DataSet("United States", "United Kingdom", "Australia", "Germany", "Canada", "France"), "") + "]"
Step 5
Click Apply to confirm your model mapping.

